| |
jetMailMonitor let you know that new mail
has come, with message or sound, checking mail server you are using
at intervals of time you fixed previously.

In case you get lot of mails, you have to connect to mail server as
occasion calls. But if you run this program once, you can concentrate
your attention to another important work cause this program let you
know you have mail or not.

How to do ? It's so simple. Let's follow up this sequence.

Though this program is available for 486 or
more, it's only available for mail servers support POP3 protocol,
so it's not available for some webmails like hotmail or yahoo mail. |
| |
|
|
| |
Step 1. Run JetMailMonitor |
|
|
|
| |
|

|
During installation, please accept
the default options. jetMailMonitor will be included in [StartUp]
folder. Program will run with booting your computer.

Running this program, an icon will appear in your system tray
without any special window. |
|
| |
|
|
| |
Step 2. Setting Up Configurations for E-Mail |
|
|
|
| |
|
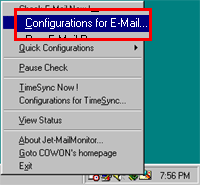 |
Set Mouse pointer on the icon in
the tray. With right-mouse click, jetMailMonitor Menu will
appear.

Menu structure of Jet Mail Monitor is simple and intuitive.
To set up for running program, select [Configurations for E-mail]. |
|
| |
|
|
| |
Step 3. Setting Up Mail accounts |
|
|
|
| |
|
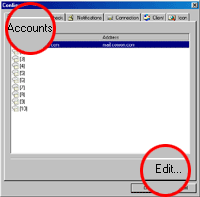 |
Select [Configurations for E- mail],
a window will appear. At first, Select [Accounts] tap.

You should register your mail account that you want to monitor.
jetMailMonitor support multiple account up to 10. It is very
useful to monitor all of your accounts in case you have 2 or
more accounts.

In accounts list screen, double-click blank or push [edit] button
below. |
|
| |
|
|
| |
Step 4. Edit account |
|
|
|
| |
|
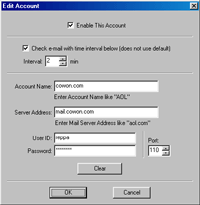 |
In [Edit Account] dialog, Enter mail
server address, user ID and password.

Check [Enable This Account]. Then you can input to activated
parts below. To designate monitoring interval for specific accounts,
check [Check e-mail with time interval below (does not use default)].
and designate it. If Not, It will check collectively by default
interval.

Input a name freely to classify your accounts into [Account
Name] and input the exact server address that you are using
now into [Server Address].

Input user ID and password to connect to mail account. Port
of mail server can be set up, if needed.

If you don't know the mail address or something accurately,
please ask your Internet Service Provider or network supervisor. |
|
| |
|
|
| |
Step 5. Setting up "Check" Method |
|
|
|
| |
|
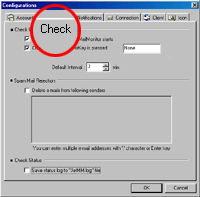 |
You can select one or both of checking
methods - [Check e-mail when jetMailMonitor starts] and [Check
e-mail when HotKey is pressed].

You can designate interval for mail check in [Default Interval].
You can designate in unit of a minute from 1 min. to 1440(24
hours).

Therefore, you can designate it according to your working pattern
or frequency of mail exchange.

[Default Interval] you designate here is applicable to all accounts.
If you want to control search interval for any specific account,
you can designate it in [Edit account] dialog as mentioned above.

Especially, [Spam Mail Rejection] is added. The function deletes
mails sent by specific sender, and saves search state as a file
is added. |
|
| |
|
|
| |
Step 6. Setting up "Notifications" Method |
|
|
|
| |
|
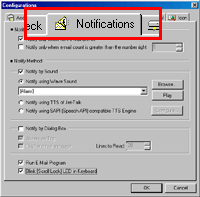 |
You can use method that let you know
whenever you have new mail or when you have more mails than
you designated previously.

Checking [Notify by Sound], it will run a wav file built in
this program. Basically, 48 sounds including sound of a bell,
alarm, gun and computer game are built in this program.

In addition to these basic sounds, others can be designated
using [Browse..] button. You can hear these sound files using
[Play] button.


[Notify by Dialog box] will open another window let you know
that you get a new mail.

Checking [Run E-Mail program], you can run a mail client program
like OutLook Express. And you can also let Scroll Lock LED flicker.
|
|
| |
|
|
| |
 |


